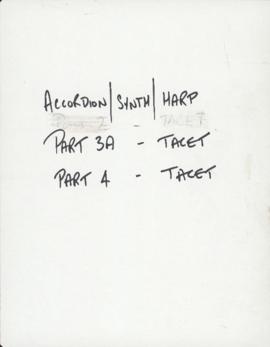
File contains a complete score for the accordion, Irish harp, and synthesizer player, with the exception of parts 3A and 4 where s/he is tacit. Because of the graphic notation in parts 1, 2, 3, 5, and 7, there are no individual instrumental scores for these parts of the composition; instead, the musician was given a copy of the full score or a score for a group of instruments (e.g. part 3). The musician then annotated their score appropriately. This part was likely performed by Sandy Moore, an accordion, Irish harp, and piano player with the Upstream Ensemble.
Item is a black and white copy of the full score for part 7 of Nasca Lines in mixed standard notation and graphic notation, used by Sandy Moore for the premiere performance. This section of the composition revisits material from parts 2, 4, and 6, and includes representations of flashcards used by the conductor, including Veto A, B, and C and flashcards indicating various improvisational styles.
Item is a black and white copy of the full score for Nasca Lines in graphic notation. The score includes representations of flashcards used by the conductor in this part, including VETO A, B, and C and flashcards indicating different improvisational styles.
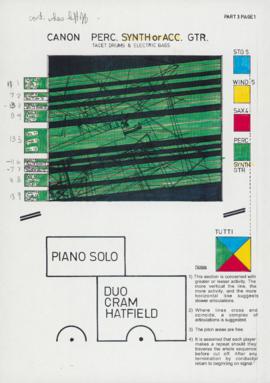
Item is a copy of the score used by the accompanying instruments (clarinet, bassoon, tenor sax, baritone sax, bass clarinet, electric bass, electric guitar, double bass, and synthesizer) for part 2 of Nasca Lines, in graphic notation.
File contains a copy of the performance notes and a complete score for the alto and soprano sax player, with the exception of parts 2 and 3A where s/he is tacit. Because of the graphic notation in parts 1, 3, 5, and 7, there are no individual instrumental scores for these parts of the composition; instead, the musician was given a copy of the full score or a score for a group of instruments (e.g. part 3). The musician then annotated their score appropriately. The alto and soprano saxophone parts were performed by Don Palmer, an Upstream musician, at the premiere performance.
Item is a black and white copy of the full score for Nasca Lines in graphic notation. The score includes representations of flashcards used by the conductor in this part, including VETO A, B, and C and flashcards indicating different improvisational styles.
Item is a copy of the score used by the accompanying instruments (clarinet, bassoon, tenor sax, baritone sax, bass clarinet, electric bass, electric guitar, double bass, and synthesizer) for part 2 of Nasca Lines, in graphic notation.
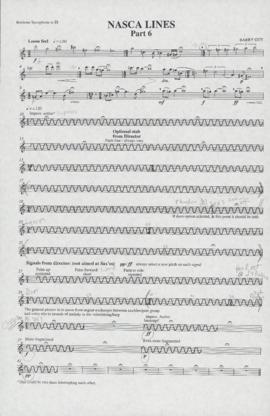
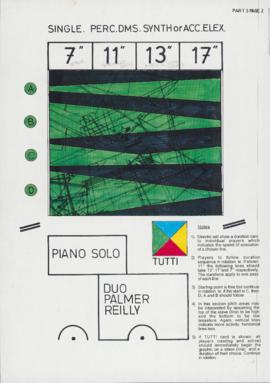
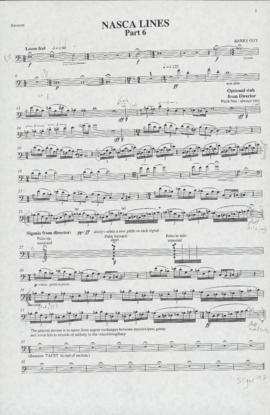
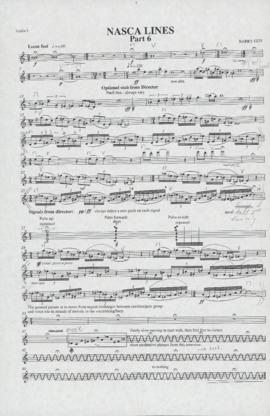
Item is the tenor saxophone part for part 6 of Nasca Lines in standard notation. The majority of this part is improvised with basic directives from the composer, e.g. "more fragmented" or "pitch free."
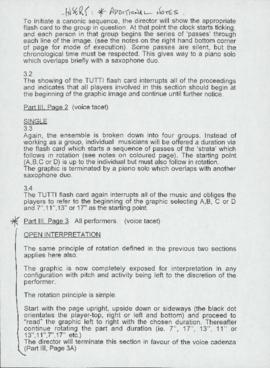
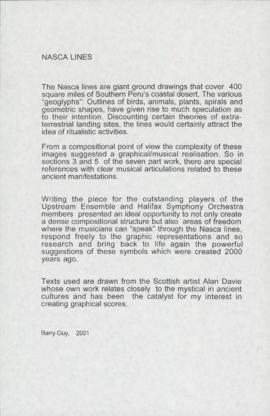
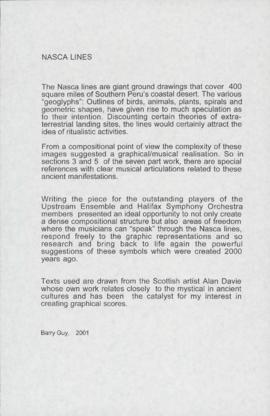
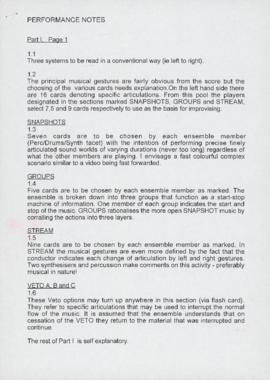
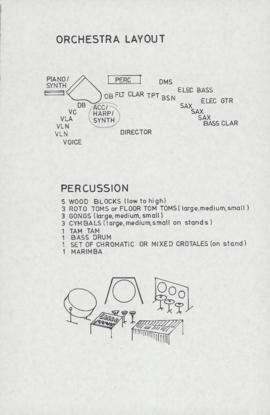
Item contains a copy of the performance notes for Nasca Lines, including an inserted page of additional notes. The performance notes include instructions for each of the seven sections of the piece; a description of the composition; and diagrams of the orchestra and percussion performance layouts.
Item is the graphic notation score used by the rhythm section for part 3 of Nasca Lines. The score was used by the drummer for the premiere performance. As the drums are tacet for the first page, this page is not included.
File contains two copies of Paul Cram's composition in 12 sections, which combines common music notation and graphic notation. The composition's commission was funded by a SOCAN grant. The piece is for 10-20 performers on flute, oboe, clarinet, bassoon, saxophone, trumpet, percussion, guitar, accordion, tape, violin, viola, violoncello, and double bass.
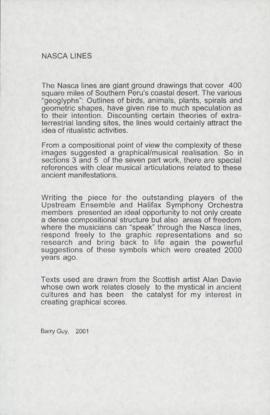
File contains the complete score in seven sections, performance notes, and flashcards used by the conductor Barry Guy for the premiere performance of Nasca Lines.
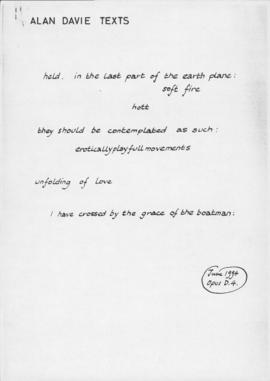
Item contains excerpts from texts by the Scottish painter Alan Davie (1920-2014) selected by Barry Guy for use in Parts 3A and 5 of the composition. The excerpts are taken from opuses D. 2 (June 1994); D.4 (June 1994); D. 15 (September 1994); D. 16 (June 1996); D. 24a (June 1996); D. 29 (May 1996); and D. 107 (1990). Davie's artwork is also one of the sources of inspiration for the graphic notation in Guy's composition.
Item is a complete conductor's score for part 1 of Nasca Lines, in graphic notation. The conductor uses the score in conjunction with flashcards, including VETO A, B, and C. Other flashcards used in the performance of this part of the composition are lost, but the images of each flashcard and their meanings are captured on the score for part 1. Each image serves as the basis for improvisation.
Item is a complete conductor's score for part 2 of Nasca Lines, featuring a string quartet and voice, with occasional contributions from the rest of the orchestra. Part 2 begins with approximated pitches and rhythms, where each instrument's part is written in relation to two outer staff lines and rhythmic values are relational (i.e. no clear metric structure). Some specific pitches are given starting on page 6 and five-line staves are used on pages 10 to 13 and 16. Sections of notated music are interspersed with improvised moments, and the string and wind instruments use extended techniques like circular bowing and multiphonics.
File contains the performance notes and flute parts for all but part 2 of the composition, as the flute is tacet during this section. Because of the graphic notation in parts 1, 3, 3A, 5, and 7, there are no individual instrumental scores for these parts of the composition; instead, the musician was given a copy of the full score or, in the case of part 3, a copy of the score for the wind quintet. The musician then annotated their score appropriately.
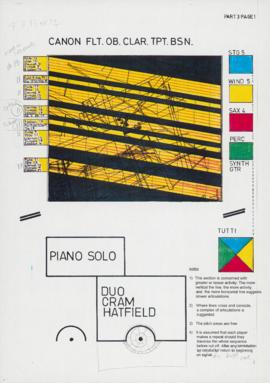
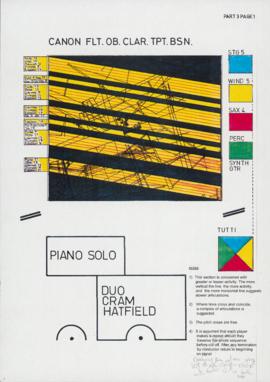
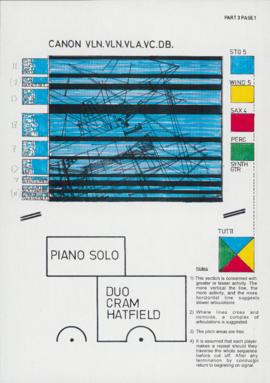
Item contains a colour copy of the score used by the wind quintet for part 3 of Nasca Lines in graphic notation. The graphic notation is taken from an aerial representation of an area of the Nazca Desert in Peru, featuring the condor geoglyph in the centre and coloured yellow for the wind quintet.
Item is a black and white copy of the full score for part 7 of Nasca Lines in mixed standard notation and graphic notation. This section of the composition revisits material from parts 2, 4, and 6, and includes representations of flashcards used by the conductor, including Veto A, B, and C and flashcards indicating various improvisational styles.
File contains the performance notes and clarinet parts. Because of the graphic notation in parts 1, 2, 3, 3A, 5, and 7, there are no individual instrumental scores for these parts of the composition; instead, the musician was given a copy of the full score or score for a group of instruments (e.g. parts 2 and 3). The musician then annotated their score appropriately.
Item is a coloured copy of the full score for part 5 of Nasca Lines in graphic notation. The score includes representations of the flashcards used by the conductor for this part of the score, including colour flashcards that indicate instrument groups (yellow for the wind quintet) and flashcards that indicate improvisational styles via graphic representations of geoglyphs from the Nazca Desert, Peru. The score also features phrases from Alan Davies' texts.
File contains the performance notes and trumpet parts for all sections of the composition except Part 2, where the trumpet is tacet. Because of the graphic notation in parts 1, 3, 3A, 5, and 7, there are no individual instrumental scores for these parts of the composition; instead, the musician was given a copy of the full score or score for a group of instruments (e.g. part 3). The musician then annotated their score appropriately. The trumpet part was likely played by Richard Simoneau, a trumpet player with the Upstream Orchestra, as there are references to a trumpeter named Richard in annotations of other orchestral parts.
Item contains a copy of the performance notes for Nasca Lines, including an inserted page of additional notes. The performance notes include instructions for each of the seven sections of the piece; a description of the composition; and diagrams of the orchestra and percussion performance layouts.
Item is a copy of the full score for part 3A of Nasca Lines in graphic notation. A rectangle in the centre of the score features the same image as part 3, an aerial representation of an area of the Nazca Desert in Peru with the condor geoglyph in the middle. Radiating outward from the central rectangle are seven sections, each featuring a graphical representation of one of the Nazca Lines geoglyphs and phrases from Alan Davie's texts and/or a tone row. The geoglyphs included are the hands, pelican, spider, monkey, condor, and two unidentified glyphs. Item also includes a copy of the five tone rows used in this part of the composition, extracted from the full score.
Item is a copy of the score used by the accompanying instruments (clarinet, bassoon, tenor sax, baritone sax, bass clarinet, electric bass, electric guitar, double bass, and synthesizer) for part 2 of Nasca Lines, in graphic notation.
Item contains a colour copy of the score used by the wind quintet for part 3 of Nasca Lines in graphic notation. The graphic notation is taken from an aerial representation of an area of the Nazca Desert in Peru, featuring the condor geoglyph in the centre and coloured yellow for the wind quintet.
Item is a black and white copy of the full score for part 7 of Nasca Lines in mixed standard notation and graphic notation. This section of the composition revisits material from parts 2, 4, and 6, and includes representations of flashcards used by the conductor, including Veto A, B, and C and flashcards indicating various improvisational styles.
File contains the performance notes and percussion parts for sections 3, 4, and 7 of the composition. The percussion is tacet in Parts 2 and 6, and there is a note on the folder from Jim F[araday], a percussionist with Upstream, indicating that he took parts 1 and 5 from the folder at some point. Because of the graphic notation in parts 3 and 7, there are no individual instrumental scores for these parts of the composition; instead, the musician was given a copy of the full score or score for a group of instruments (e.g. part 3). The musician then annotated their score appropriately.
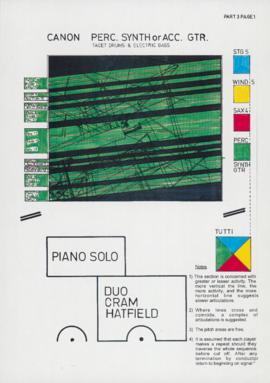
Item contains a colour copy of the score used by the rhythm section for part 3 of Nasca Lines in graphic notation. The graphic notation is taken from an aerial representation of an area of the Nazca Desert in Peru, featuring the condor geoglyph in the centre and coloured green for the rhythm section. This copy of the score was used by [Jim Faraday] for the premiere performance.
Item is a black and white copy of the full score for part 7 of Nasca Lines in mixed standard notation and graphic notation. This section of the composition revisits material from parts 2, 4, and 6, and includes representations of flashcards used by the conductor, including Veto A, B, and C and flashcards indicating various improvisational styles.
Item contains a copy of the performance notes for Nasca Lines, including an inserted page of additional notes. The performance notes include instructions for each of the seven sections of the piece; a description of the composition; and diagrams of the orchestra and percussion performance layouts.
Item is a copy of the full score for part 2 of Nasca Lines, in mixed graphic and standard notation. The voice part is entirely improvised in this section, with some basic directives from the composer, e.g. "react to st[ring] qu[artet] articulations."
Item contains a copy of the performance notes for Nasca Lines, including an inserted page of additional notes. The performance notes include instructions for each of the seven sections of the piece; a description of the composition; and diagrams of the orchestra and percussion performance layouts.
File contains the performance notes and second violin parts for all sections of the composition except part 3A where the second violin is tacet. Because of the graphic notation in parts 1, 2, 3, 5, and 7, there are no individual instrumental scores for these parts of the composition; instead, the musician was given a copy of the full score or a score for a group of instruments (e.g. part 3). The musician then annotated their score appropriately.
Item contains a copy of the performance notes for Nasca Lines, including an inserted page of additional notes. The performance notes include instructions for each of the seven sections of the piece.
Item is a copy of the score used by the second violinist for part 2 of Nasca Lines, in mixed graphic and standard notation. Sections of notated music are interspersed with improvised moments, and the violinist employs extended techniques like circular bowing.
Item is a black and white copy of the full score for part 7 of Nasca Lines in mixed standard notation and graphic notation. This section of the composition revisits material from parts 2, 4, and 6, and includes representations of flashcards used by the conductor, including Veto A, B, and C and flashcards indicating various improvisational styles. Two sections from the string parts of part 2 of Nasca Lines have been taped over the score and an extra copy of page 13 of part 2 is also included.
Item contains a colour copy of the score used by the string quintet for part 3 of Nasca Lines in graphic notation. The graphic notation is taken from an aerial representation of an area of the Nazca Desert in Peru, featuring the condor geoglyph in the centre and coloured blue for the string quintet.
Item is a black and white copy of the full score for part 7 of Nasca Lines in mixed standard notation and graphic notation. This section of the composition revisits material from parts 2, 4, and 6, and includes representations of flashcards used by the conductor, including Veto A, B, and C and flashcards indicating various improvisational styles. Two sections from the string parts of part 2 of Nasca Lines have been taped over sections of the score.
Item contains a copy of the performance notes for Nasca Lines, including an inserted page of additional notes. The performance notes include instructions for each of the seven sections of the piece; a description of the composition; and diagrams of the orchestra and percussion performance layouts.
Item contains a colour copy of the score used by the string quintet for part 3 of Nasca Lines in graphic notation. The graphic notation is taken from an aerial representation of an area of the Nazca Desert in Peru, featuring the condor geoglyph in the centre and coloured blue for the string quintet.
Item is a black and white copy of the full score for Nasca Lines in graphic notation. The score includes representations of flashcards used by the conductor in this part, including VETO A, B, and C and flashcards indicating different improvisational styles.
Item is a copy of the score used by the accompanying instruments (clarinet, bassoon, tenor sax, baritone sax, bass clarinet, electric bass, electric guitar, double bass, and synthesizer) for part 2 of Nasca Lines, in graphic notation.
Item contains a colour copy of the score used by the rhythm section for part 3 of Nasca Lines in graphic notation. The graphic notation is taken from an aerial representation of an area of the Nazca Desert in Peru, featuring the condor geoglyph in the centre and coloured green for the rhythm section.
![Nasca lines : part 7 : [full score]](/uploads/r/dalhousie-university-archives/f/4/b/f4b0cefef2148a7401342436bd6041570fce21553d084b3cbc2fec511044fc02/MS-5-16_OS17_7_access_142.jpg)
![Nasca lines : part 1 : [full score]](/uploads/r/dalhousie-university-archives/b/6/e/b6e68aa9c899cef7b67eff27e78d0ff1a47a1dde66c9fe11e85e124c60fb4b82/MS-5-16_OS18_2_access_142.jpg)
![Nasca lines : part 2 : [accompanying instruments]](/uploads/r/dalhousie-university-archives/c/e/a/ceaca421d170d006a6a0d7b776fe3f108f949f10c64dac56159d1e3296eefad9/MS-5-16_OS18_3_access_142.jpg)
![Nasca lines : part 1 : [full score]](/uploads/r/dalhousie-university-archives/4/c/e/4cecc0d4599004a58d8ee769c49ea8ad3bb56bbdacb7f413f61a58cc6ded5316/MS-5-16_OS21_2_access_142.jpg)
![Nasca lines : part 2 : [accompanying instruments]](/uploads/r/dalhousie-university-archives/2/c/2/2c2ea544b01721db678de5645884f1c3498cce0e73be36cf40f4d5a6a6cadf43/MS-5-16_OS21_3_access_142.jpg)
![Nasca lines : part 1: [full score]](/uploads/r/dalhousie-university-archives/7/c/4/7c49255c1d53142a48dc7623b03ad8a2f818ff7e76b392f3b9184448a382bc18/MS-5-16_OS3_11_access_142.jpg)
![Nasca lines : part 2 : [full score]](/uploads/r/dalhousie-university-archives/3/b/c/3bc20363bf8b8e2e6603904ed4137484bab44d6c66b1b82f713bacbe03f27182/MS-5-16_OS3_12_access_142.jpg)
![Nasca lines : part 7 : [full score]](/uploads/r/dalhousie-university-archives/a/a/f/aaf5b0f15a3ad76d91c209b028943164814d6fafc942b3a23811d757a6dfe0fe/MS-5-16_OS5_8_access_142.jpg)
![Nasca lines : part 5 : [full score]](/uploads/r/dalhousie-university-archives/5/1/e/51e9fcb19bdffda8c27f077f3f5663a2aa78cfe4674a92b83f99c3ab77d9416e/MS-5-16_OS6_7_access_142.jpg)
![Nasca lines : part 3A : [full score]](/uploads/r/dalhousie-university-archives/4/7/3/4736d8fe2cd6c6579e19af4c2f05a8d08f10e7cceec011950c7894dc697a68da/MS-5-16_OS7_5_access_142.jpg)
![Nasca lines : part 2 : [accompanying instruments]](/uploads/r/dalhousie-university-archives/9/9/6/99664ce13b87cb2a42b77616b54ba17ba32fc2556c9d6b1a5d524acab29e0b85/MS-5-16_OS8_3_access_142.jpg)
![Nasca lines : part 7 : [full score]](/uploads/r/dalhousie-university-archives/a/6/9/a69f93070ac3118a38661f6c366aa2ace6070201e87577dc03add5ae406edcf3/MS-5-16_OS8_9_access_142.jpg)
![Nasca lines : part 7 : [full score]](/uploads/r/dalhousie-university-archives/4/6/a/46a01d23827c45db0b6554b846e8e94abe47da2b9900596d2ea5b87721fbcd58/MS-5-16_OS10_9_access_142.jpg)
![Nasca lines : part 2 : [full score]](/uploads/r/dalhousie-university-archives/e/4/e/e4e7ababa1cd8b89188acb969090e998f605dfc324a90235c1e1fed7e9204a77/MS-5-16_OS11_3_access_142.jpg)
![Nasca lines : part 2 : [full score]](/uploads/r/dalhousie-university-archives/4/b/9/4b96eb2dc6cc8bac9ea5841fc267a60b6d513ae5321771815b40b7c33f6f548b/MS-5-16_OS13_3_access_142.jpg)
![Nasca lines : part 7 : [full score]](/uploads/r/dalhousie-university-archives/5/1/f/51fd12d326a4120e3b49738b3b98489bdc156f0ebb168e4e08a6dec6e7497af7/MS-5-16_OS13_8_access_142.jpg)
![Nasca lines : part 7 : [full score]](/uploads/r/dalhousie-university-archives/f/a/e/fae43274894b4a12d5c77452fc5c4425c09b630cefc5df254debf512a236e946/MS-5-16_OS14_9_access_142.jpg)

![Nasca lines : part 1 : [full score]](/uploads/r/dalhousie-university-archives/4/5/a/45a871d2a91c111105729b10b221ec7103233c48299e64ef733740b843e3d119/MS-5-16_OS17_1_access_142.jpg)
![Nasca lines : part 2 : [accompanying instruments]](/uploads/r/dalhousie-university-archives/3/b/b/3bb4ed15e0444b5be71f768530f86ace2da612fa431af6b703167eab6c179596/MS-5-16_OS17_2_access_142.jpg)