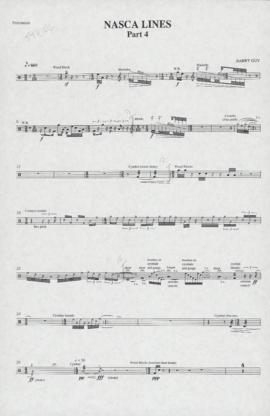
Item contains the percussion part for part 4 of Nasca Lines in standard notation. Item also includes a copy of the last two pages of the full score for part 4, which have graphic notation.
Item contains a colour copy of the score used by the rhythm section for part 3 of Nasca Lines in graphic notation. The graphic notation is taken from an aerial representation of an area of the Nazca Desert in Peru, featuring the condor geoglyph in the centre and coloured green for the rhythm section. This copy of the score was used by [Jim Faraday] for the premiere performance.
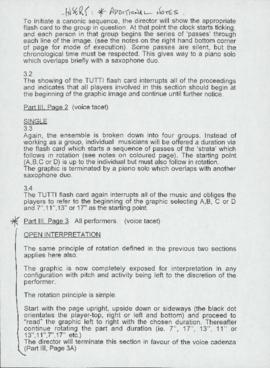
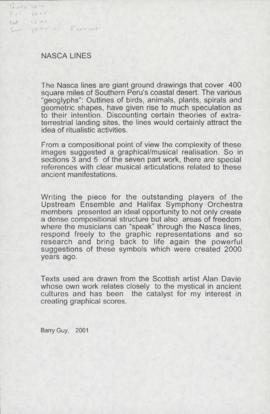
Item contains a copy of the performance notes for Nasca Lines, including an inserted page of additional notes. The performance notes include instructions for each of the seven sections of the piece; a description of the composition; and diagrams of the orchestra and percussion performance layouts.
Item is a black and white copy of the full score for part 7 of Nasca Lines in mixed standard notation and graphic notation. This section of the composition revisits material from parts 2, 4, and 6, and includes representations of flashcards used by the conductor, including Veto A, B, and C and flashcards indicating various improvisational styles.
Item is a coloured copy of the full score for part 5 of Nasca Lines in graphic notation. The score includes representations of the flashcards used by the conductor for this part of the score, including colour flashcards that indicate instrument groups (yellow for the wind quintet) and flashcards that indicate improvisational styles via graphic representations of geoglyphs from the Nazca Desert, Peru. The score also features phrases from Alan Davies' texts. «
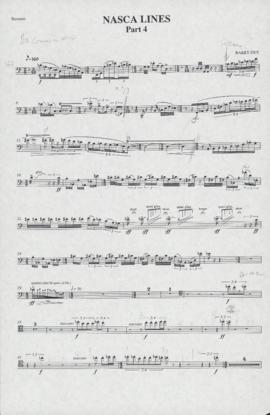
Item contains the bassoon part for part 4 of Nasca Lines in standard notation. The bassoon part includes microtones. Item also includes a copy of the last two pages of the full score for part 4, which have graphic notation.
Item contains a colour copy of the score used by the wind quintet for part 3 of Nasca Lines in graphic notation. The graphic notation is taken from an aerial representation of an area of the Nazca Desert in Peru, featuring the condor geoglyph in the centre and coloured yellow for the wind quintet.
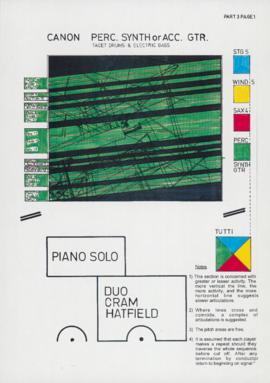
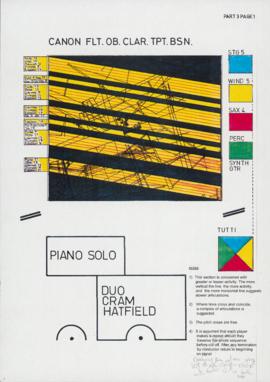
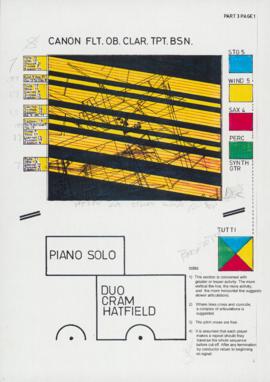
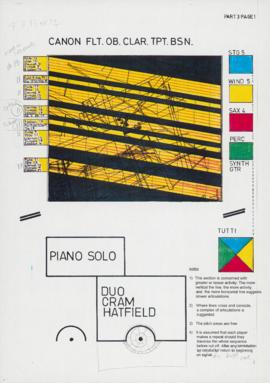
Item is a copy of the score used by the accompanying instruments (clarinet, bassoon, tenor sax, baritone sax, bass clarinet, electric bass, electric guitar, double bass, and synthesizer) for part 2 of Nasca Lines, in graphic notation.
Item is a black and white copy of the full score for Nasca Lines in graphic notation. The score includes representations of flashcards used by the conductor in this part, including VETO A, B, and C and flashcards indicating different improvisational styles.
Item contains a copy of the performance notes for Nasca Lines, including an inserted page of additional notes. The performance notes include instructions for each of the seven sections of the piece; a description of the composition; and diagrams of the orchestra and percussion performance layouts.
Item is a black and white copy of the full score for part 7 of Nasca Lines in mixed standard notation and graphic notation. This section of the composition revisits material from parts 2, 4, and 6, and includes representations of flashcards used by the conductor, including Veto A, B, and C and flashcards indicating various improvisational styles.
Item is a coloured copy of the full score for part 5 of Nasca Lines in graphic notation. The score includes representations of the flashcards used by the conductor for this part of the score, including colour flashcards that indicate instrument groups (yellow for the wind quintet) and flashcards that indicate improvisational styles via graphic representations of geoglyphs from the Nazca Desert, Peru. The score also features phrases from Alan Davies' texts.
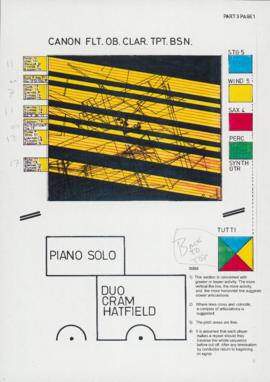
Item is a copy of the full score for part 3A of Nasca Lines in graphic notation. A rectangle in the centre of the score features the same image as part 3, an aerial representation of an area of the Nazca Desert in Peru with the condor geoglyph in the middle. Radiating outward from the central rectangle are seven sections, each featuring a graphical representation of one of the Nazca Lines geoglyphs and phrases from Alan Davie's texts and/or a tone row. The geoglyphs included are the hands, pelican, spider, monkey, condor, and two unidentified glyphs. Item also includes a copy of the five tone rows used in this part of the composition, extracted from the full score.
Item contains a colour copy of the score used by the wind quintet for part 3 of Nasca Lines in graphic notation. The graphic notation is taken from an aerial representation of an area of the Nazca Desert in Peru, featuring the condor geoglyph in the centre and coloured yellow for the wind quintet.
Item is a black and white copy of the full score for Nasca Lines in graphic notation. The score includes representations of flashcards used by the conductor in this part, including VETO A, B, and C and flashcards indicating different improvisational styles.
Item contains a copy of the performance notes for Nasca Lines, including an inserted page of additional notes. The performance notes include instructions for each of the seven sections of the piece; a description of the composition; and diagrams of the orchestra and percussion performance layouts.
Item is a black and white copy of the full score for part 7 of Nasca Lines in mixed standard notation and graphic notation. This section of the composition revisits material from parts 2, 4, and 6, and includes representations of flashcards used by the conductor, including Veto A, B, and C and flashcards indicating various improvisational styles.
Item is a coloured copy of the full score for part 5 of Nasca Lines in graphic notation. The score includes representations of the flashcards used by the conductor for this part of the score, including colour flashcards that indicate instrument groups (yellow for the wind quintet) and flashcards that indicate improvisational styles via graphic representations of geoglyphs from the Nazca Desert, Peru. The score also features phrases from Alan Davies' texts.
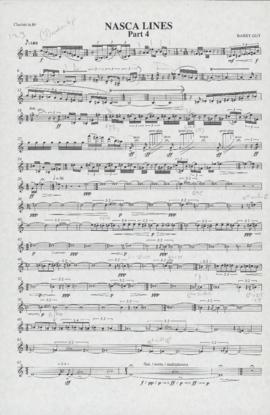
Item contains the clarinet part for part 4 of Nasca Lines in standard notation. The clarinet part features extended techniques, including quarter tones and multiphonics, and has frequent meter changes. Item also includes a copy of the last two pages of the full score for part 4, which have graphic notation.
Item is a black and white copy of the full score for part 3A of Nasca Lines in graphic notation. A rectangle in the centre of the score features the same image as part 3, an aerial representation of an area of the Nazca Desert in Peru with the condor geoglyph in the middle. Radiating outward from the central rectangle are seven sections, each featuring a graphical representation of one of the Nazca Lines geoglyphs and phrases from Alan Davie's texts and/or a tone row. The geoglyphs included are the hands, pelican, spider, monkey, condor, and two unidentified glyphs. Item also includes a copy of the five tone rows used in this part of the composition, extracted from the full score.
Item is a copy of the score used by the accompanying instruments (clarinet, bassoon, tenor sax, baritone sax, bass clarinet, electric bass, electric guitar, double bass, and synthesizer ) for part 2 of Nasca Lines, in graphic notation.
Item contains a colour copy of the score used by the wind quintet for part 3 of Nasca Lines in graphic notation. The graphic notation is taken from an aerial representation of an area of the Nazca Desert in Peru, featuring the condor geoglyph in the centre and coloured yellow for the wind quintet.
Item is a black and white copy of the full score for Nasca Lines in graphic notation. The score includes representations of flashcards used by the conductor in this part, including VETO A, B, and C and flashcards indicating different improvisational styles.
Item contains a copy of the performance notes for Nasca Lines. The performance notes include instructions for each of the seven sections of the piece; a description of the composition; and diagrams of the orchestra and percussion performance layouts.
Item is a black and white copy of the full score for part 7 of Nasca Lines in mixed standard notation and graphic notation. This section of the composition revisits material from parts 2, 4, and 6, and includes representations of flashcards used by the conductor, including Veto A, B, and C and flashcards indicating various improvisational styles.
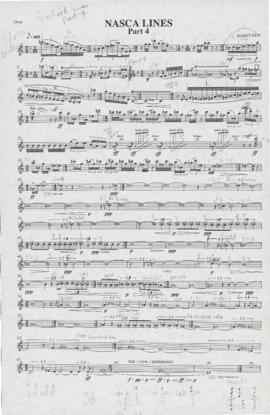
Item contains the oboe part for part 4 of Nasca Lines in standard notation. The oboe part features extended techniques, including quarter tones and multiphonics, and has frequent meter changes.
Item is a coloured copy of the full score for part 5 of Nasca Lines. The score includes representations of the flashcards used by the conductor for this part of the score, including colour flashcards that indicate instrument groups (yellow for the wind quintet) and flashcards that indicate improvisational styles via graphic representations of geoglyphs from the Nazca Desert, Peru. The score also features phrases from Alan Davies' texts.
Item is a black and white copy of the full score for part 3A of Nasca Lines in graphic notation. A rectangle in the centre of the score features the same image as part 3, an aerial representation of an area of the Nazca Desert in Peru with the condor geoglyph in the middle. Radiating outward from the central rectangle are seven sections, each featuring a graphical representation of one of the Nazca Lines geoglyphs and phrases from Alan Davie's texts and/or a tone row. The geoglyphs included are the hands, pelican, spider, monkey, condor, and two unidentified glyphs. Item also includes a copy of the five tone rows used in this part of the composition, extracted from the full score.
Item contains a colour copy of the score used by the wind quintet for part 3 of Nasca Lines in graphic notation. The graphic notation is taken from an aerial representation of an area of the Nazca Desert in Peru, featuring the condor geoglyph in the centre and coloured yellow for the wind quintet.
Item contains a copy of the performance notes for Nasca Lines, including an inserted page of additional notes. The performance notes include instructions for each of the seven sections of the piece; a description of the composition; and diagrams of the orchestra and percussion performance layouts.
Item is a black and white copy of the full score for Nasca Lines in graphic notation. The score includes representations of flashcards used by the conductor in this part, including VETO A, B, and C and flashcards indicating different improvisational styles.
Item is a black and white copy of the full score for part 7 of Nasca Lines in mixed standard notation and graphic notation. This section of the composition revisits material from parts 2, 4, and 6, and includes representations of flashcards used by the conductor, including Veto A, B, and C and flashcards indicating various improvisational styles.
Item is a coloured copy of the full score for part 5 of Nasca Lines in graphic notation. The score includes representations of the flashcards used by the conductor for this part of the score, including colour flashcards that indicate instrument groups (yellow for the wind quintet) and flashcards that indicate improvisational styles via graphic representations of geoglyphs from the Nazca Desert, Peru. The score also features phrases from Alan Davies' texts.
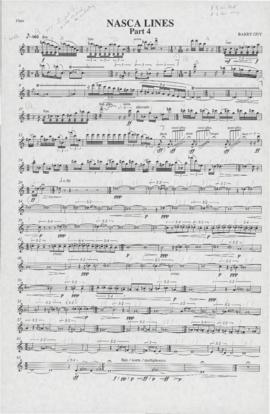
Item contains the flute part for part 4 of Nasca Lines in standard notation. Item also includes a copy of the last two pages of the full score for part 4, which have graphic notation. The flute part features extended techniques, including quarter tones and multiphonics, and has frequent meter changes.
Item is a black and white copy of the full score for part 3A of Nasca Lines in graphic notation. A rectangle in the centre of the score features the same image as part 3, an aerial representation of an area of the Nazca Desert in Peru with the condor geoglyph in the middle. Radiating outward from the central rectangle are seven sections, each featuring a graphical representation of one of the Nazca Lines geoglyphs and phrases from Alan Davie's texts and/or a tone row. The geoglyphs included are the hands, pelican, spider, monkey, condor, and two unidentified glyphs. Item also includes a copy of the five tone rows used in this part of the composition, extracted from the full score.
Item contains a colour copy of the score used by the wind quintet for part 3 of Nasca Lines in graphic notation. The graphic notation is taken from an aerial representation of an area of the Nazca Desert in Peru, featuring the condor geoglyph in the centre and coloured yellow for the wind quintet.
Item is a black and white copy of the full score for Nasca Lines in graphic notation. The score includes representations of flashcards used by the conductor in this part, including VETO A, B, and C and flashcards indicating different improvisational styles.
Item contains a copy of the performance notes for Nasca Lines, including an inserted page of additional notes. The performance notes include instructions for each of the seven sections of the piece; a description of the composition; and diagrams of the orchestra and percussion performance layouts.
Item is a complete conductor's score for part 7 of Nasca Lines, in standard notation and graphic notation. The conductor uses this score in conjunction with flashcards that indicate different improvisational styles; these flashcards are no longer part of Upstream's Music Score Library. This section of the composition revisits material from parts 2, 4, and 6.
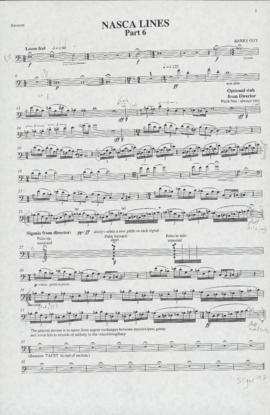
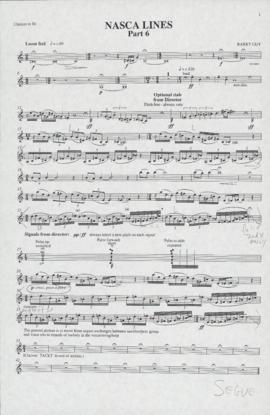
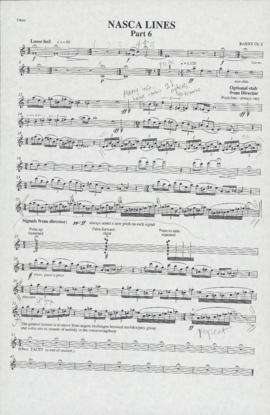
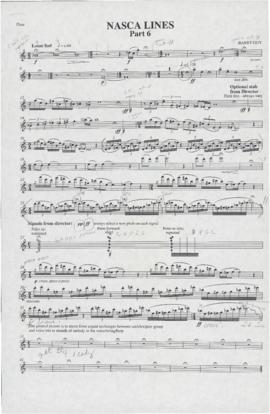
Item is a complete conductor's score for part 6 of Nasca Lines, in standard notation, featuring the saxophones, electric guitar, bass, and drums, with accompanying material provided by the remaining instruments. This section integrates moments of improvisation into the composed portions, frequently layering improvisation with composition (i.e. one or more instruments improvise, whilst others play that which is written). This section features pitch-class set sequences and a loose meter with frequent changes of time signature.
![Nasca lines : part 7 : [full score]](/uploads/r/dalhousie-university-archives/a/6/9/a69f93070ac3118a38661f6c366aa2ace6070201e87577dc03add5ae406edcf3/MS-5-16_OS8_9_access_142.jpg)
![Nasca lines : part 5 : [full score]](/uploads/r/dalhousie-university-archives/8/9/1/89108535f36db6fa8aec15eca84d665284c1f46a64e07737086f7a1b76d3ba6a/MS-5-16_OS8_7_access_142.jpg)
![Nasca lines : part 2 : [accompanying instruments]](/uploads/r/dalhousie-university-archives/9/9/6/99664ce13b87cb2a42b77616b54ba17ba32fc2556c9d6b1a5d524acab29e0b85/MS-5-16_OS8_3_access_142.jpg)
![Nasca lines : part 1 : [full score]](/uploads/r/dalhousie-university-archives/1/f/b/1fb016d5098a640b48f12a68cd1d44514561fbe0dd992569a9d29539fb3e8ad5/MS-5-16_OS8_2_access_142.jpg)

![Nasca lines : part 7 : [full score]](/uploads/r/dalhousie-university-archives/4/f/3/4f3213498992702b3b0aacaf6e60816ff9f19399f584989f0e18977b1a4efbac/MS-5-16_OS7_9_access_142.jpg)
![Nasca lines : part 5 : [full score]](/uploads/r/dalhousie-university-archives/b/d/3/bd3048621a58740a8b45a6c1ace968b4c0aa760df661b1188a5487c66d90c459/MS-5-16_OS7_7_access_142.jpg)

![Nasca lines : part 3A : [full score]](/uploads/r/dalhousie-university-archives/4/7/3/4736d8fe2cd6c6579e19af4c2f05a8d08f10e7cceec011950c7894dc697a68da/MS-5-16_OS7_5_access_142.jpg)
![Nasca lines : part 1 : [full score]](/uploads/r/dalhousie-university-archives/f/2/3/f231976b3fb8c813a3ecdaf4bee583f17aceced871a472ed6fe5f9c64060fac4/MS-5-16_OS7_2_access_142.jpg)
![Nasca lines : part 7 : [full score]](/uploads/r/dalhousie-university-archives/5/f/0/5f049d18eacba1e7dfce5360002a86986f7a562ac9fd6d6c2a8238db32c85bc5/MS-5-16_OS6_9_access_142.jpg)
![Nasca lines : part 5 : [full score]](/uploads/r/dalhousie-university-archives/5/1/e/51e9fcb19bdffda8c27f077f3f5663a2aa78cfe4674a92b83f99c3ab77d9416e/MS-5-16_OS6_7_access_142.jpg)
![Nasca lines : part 3A : [full score]](/uploads/r/dalhousie-university-archives/3/2/e/32e7595a9fd51148a602a6db79a30020c272b9cbdfa41502db2a78ce1d313f58/MS-5-16_OS6_5_access_142.jpg)
![Nasca lines : part 2 : [accompanying instruments]](/uploads/r/dalhousie-university-archives/a/1/2/a12b836e6d74258d9a47d51a9d292c5649dc74da6da5bd9a73a1a65d230cad7c/MS-5-16_OS6_3_access_142.jpg)
![Nasca lines : part 1: [full score]](/uploads/r/dalhousie-university-archives/c/7/6/c76c9234783869473f415a0f0c9f9a5cc93e186873cf33e548aab02097c6ebc3/MS-5-16_OS6_2_access_142.jpg)
![Nasca lines : part 7 : [full score]](/uploads/r/dalhousie-university-archives/a/a/f/aaf5b0f15a3ad76d91c209b028943164814d6fafc942b3a23811d757a6dfe0fe/MS-5-16_OS5_8_access_142.jpg)
![Nasca lines : part 5 : [full score]](/uploads/r/dalhousie-university-archives/6/1/a/61a00e48ca2fcfa49671af95f7d7521dca8af7bda10c5d4acd9f72353f3f13ff/MS-5-16_OS5_6_access_142.jpg)
![Nasca lines : part 3A : [full score]](/uploads/r/dalhousie-university-archives/e/9/6/e961aa29c02be249f5af5799c4ddfe450a469986a9d3dd13936fe084c429cc07/MS-5-16_OS5_4_access_142.jpg)

![Nasca lines : part 1 : [full score]](/uploads/r/dalhousie-university-archives/6/0/2/602b12a8f33b3638f32aeebefc4c41b500d61977ac86b37d48fefe99f80944a1/MS-5-16_OS5_2_access_142.jpg)
![Nasca lines : part 7 : [full score]](/uploads/r/dalhousie-university-archives/5/5/d/55dd51c292e63cf1013cb36a7492a069d05de2fffef9ee99401d0793846000c0/MS-5-16_OS4_8_access_142.jpg)
![Nasca lines : part 5 : [full score]](/uploads/r/dalhousie-university-archives/4/3/3/43326735eb4bcfc1062e7be485a0ccdc3d0488584c4e98a904a411f6c8ab98ac/MS-5-16_OS4_6_access_142.jpg)
![Nasca lines : part 3A : [full score]](/uploads/r/dalhousie-university-archives/6/f/d/6fde65159c5c0f75d16a8f3e2dd6cd15dfe405b6b0973f64d1cd8ad29661db5d/MS-5-16_OS4_4_access_142.jpg)

![Nasca lines : part 1 : [full score]](/uploads/r/dalhousie-university-archives/6/1/2/612087d6372e101b9b53881f92377735d1879115d40958cd15b4a628dae00406/MS-5-16_OS4_2_access_142.jpg)
![Nasca lines : part 7 : [full score]](/uploads/r/dalhousie-university-archives/9/4/6/94630d5f5009bf74a6659e88933c82ef13bd1de068df9c94d2ac2f15fd2070c2/MS-5-16_OS3_18_access_142.jpg)
![Nasca lines : part 6 : [full score]](/uploads/r/dalhousie-university-archives/7/7/a/77acb2b3fb9f21ea629b9c3e3fc880ada554e0a8466a1f04b457467a54cdee94/MS-5-16_OS3_17_access_142.jpg)