File contains correspondence from the Canada Council and two annotated copies of the application for funding for Upstream's 1996-1997 and 1997-1998 seasons.
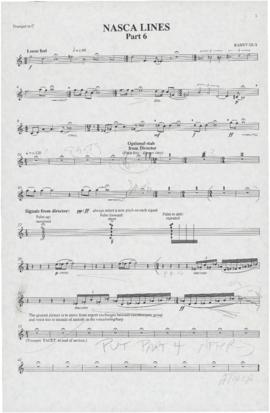
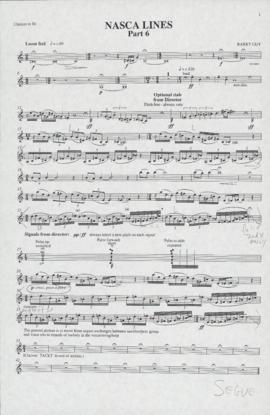
Item is a black and white copy of the full score for part 7 of Nasca Lines in mixed standard notation and graphic notation. This section of the composition revisits material from parts 2, 4, and 6, and includes representations of flashcards used by the conductor, including Veto A, B, and C and flashcards indicating various improvisational styles. The score was used by [Jim Faraday] for the premiere of the composition.
File contains the studio mastering tape for Steven Naylor's composition, "Forests," completed at Solar Audio Recording studio in Halifax, Nova Scotia. Audio reel box includes track sheets.
File contains the studio mastering tape for the second take of Steve Reilly's composition, "Sunrise to a Mad Afternoon," completed at Solar Audio Recording studio in Halifax, Nova Scotia. The recording is on Upstream's CD, "Open Water" (track 6, 10 min., 1 sec.). Audio reel box includes a track sheet.
File contains the studio mastering tape for "Winds of Lyra" by Sandy Moore, completed at Solar Audio Recording studio in Halifax, Nova Scotia. The recordings are on Upstream's CD, "Open Water" (track 4, 9 min., 6 sec.). Audio reel box includes track sheet.
File contains the studio mastering tape for "Standing in the light" by Steve Tittle, completed at Solar Audio Recording studio in Halifax, Nova Scotia. The recordings are on Upstream's CD, "Open Water" (track 1, 12 min., 28 sec.). Audio reel box includes track sheet.
File contains the studio mastering tape for "Nocturne" by Steven Naylor and "Pulseight" by Tom Roach, completed at Solar Audio Recording studio in Halifax, Nova Scotia. The recordings are on Upstream's CD, "Open Water" (track 2, 7 min. and track 3, 2 min., 50 sec., respectively). Audio reel box includes track sheets for both pieces.
File contains the studio mastering tape for Paul Cram's composition "Immortal coil" and Don Palmer's composition "Fragments," completed at Solar Audio Recording studio in Halifax, Nova Scotia. The recordings are on Upstream's CD, "Open Water" (track 7, 8 min., 20 sec., and track 5, 5 min., 38 sec., respectively). Audio reel box includes a track sheet.
File contains the studio mastering tape for the first take of Steve Reilly's composition, "Sunrise to a Mad Afternoon," completed at Solar Audio Recording studio in Halifax, Nova Scotia. The recording is on Upstream's CD, "Open Water" (track 6, 10 min., 1 sec.). Audio reel box includes a track sheet.
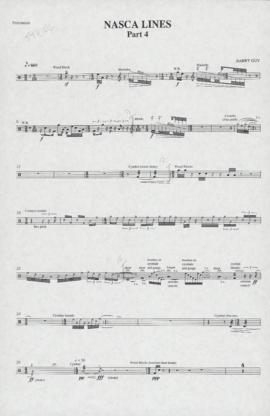
Item contains the percussion part for part 4 of Nasca Lines in standard notation. Item also includes a copy of the last two pages of the full score for part 4, which have graphic notation.
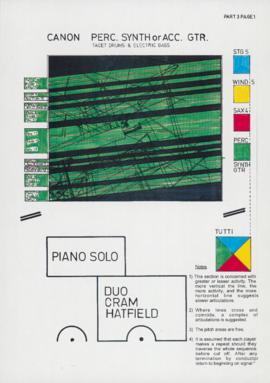
Item contains a colour copy of the score used by the rhythm section for part 3 of Nasca Lines in graphic notation. The graphic notation is taken from an aerial representation of an area of the Nazca Desert in Peru, featuring the condor geoglyph in the centre and coloured green for the rhythm section. This copy of the score was used by [Jim Faraday] for the premiere performance.
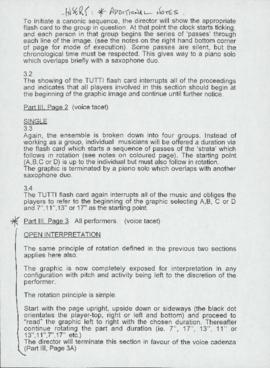
Item contains a copy of the performance notes for Nasca Lines, including an inserted page of additional notes. The performance notes include instructions for each of the seven sections of the piece; a description of the composition; and diagrams of the orchestra and percussion performance layouts.
File contains the performance notes and percussion parts for sections 3, 4, and 7 of the composition. The percussion is tacet in Parts 2 and 6, and there is a note on the folder from Jim F[araday], a percussionist with Upstream, indicating that he took parts 1 and 5 from the folder at some point. Because of the graphic notation in parts 3 and 7, there are no individual instrumental scores for these parts of the composition; instead, the musician was given a copy of the full score or score for a group of instruments (e.g. part 3). The musician then annotated their score appropriately.
Item is a black and white copy of the full score for part 7 of Nasca Lines in mixed standard notation and graphic notation. This section of the composition revisits material from parts 2, 4, and 6, and includes representations of flashcards used by the conductor, including Veto A, B, and C and flashcards indicating various improvisational styles.
Item is a coloured copy of the full score for part 5 of Nasca Lines in graphic notation. The score includes representations of the flashcards used by the conductor for this part of the score, including colour flashcards that indicate instrument groups (yellow for the wind quintet) and flashcards that indicate improvisational styles via graphic representations of geoglyphs from the Nazca Desert, Peru. The score also features phrases from Alan Davies' texts. «
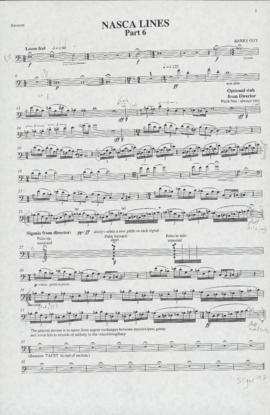
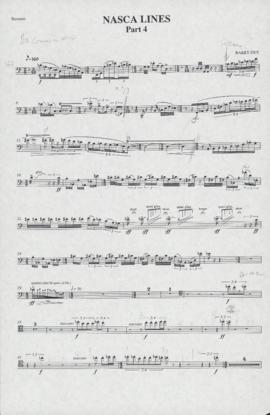
Item contains the bassoon part for part 4 of Nasca Lines in standard notation. The bassoon part includes microtones. Item also includes a copy of the last two pages of the full score for part 4, which have graphic notation.
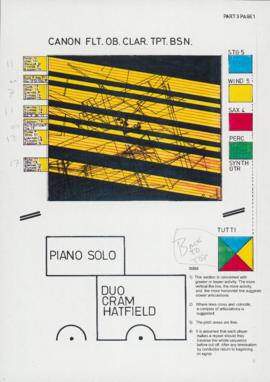
Item contains a colour copy of the score used by the wind quintet for part 3 of Nasca Lines in graphic notation. The graphic notation is taken from an aerial representation of an area of the Nazca Desert in Peru, featuring the condor geoglyph in the centre and coloured yellow for the wind quintet.
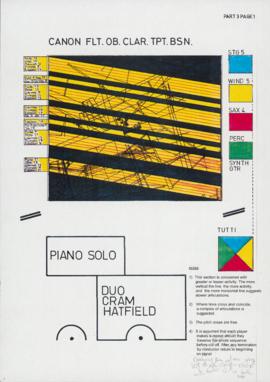
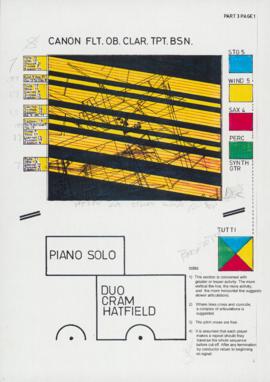
Item is a copy of the score used by the accompanying instruments (clarinet, bassoon, tenor sax, baritone sax, bass clarinet, electric bass, electric guitar, double bass, and synthesizer) for part 2 of Nasca Lines, in graphic notation.
Item is a black and white copy of the full score for Nasca Lines in graphic notation. The score includes representations of flashcards used by the conductor in this part, including VETO A, B, and C and flashcards indicating different improvisational styles.
Item contains a copy of the performance notes for Nasca Lines, including an inserted page of additional notes. The performance notes include instructions for each of the seven sections of the piece; a description of the composition; and diagrams of the orchestra and percussion performance layouts.
File contains the performance notes and bassoon parts for all sections of the composition except Part 3A, where the bassoon is tacet. Because of the graphic notation in parts 1, 2, 3, 5, and 7, there are no individual instrumental scores for these parts of the composition; instead, the musician was given a copy of the full score or score for a group of instruments (e.g. parts 2 and 3). The musician then annotated their score appropriately. The bassoon part was played by Chris Palmer, a bassoonist with Symphony Nova Scotia.
Item is a black and white copy of the full score for part 7 of Nasca Lines in mixed standard notation and graphic notation. This section of the composition revisits material from parts 2, 4, and 6, and includes representations of flashcards used by the conductor, including Veto A, B, and C and flashcards indicating various improvisational styles.
Item is a coloured copy of the full score for part 5 of Nasca Lines in graphic notation. The score includes representations of the flashcards used by the conductor for this part of the score, including colour flashcards that indicate instrument groups (yellow for the wind quintet) and flashcards that indicate improvisational styles via graphic representations of geoglyphs from the Nazca Desert, Peru. The score also features phrases from Alan Davies' texts.
Item is a copy of the full score for part 3A of Nasca Lines in graphic notation. A rectangle in the centre of the score features the same image as part 3, an aerial representation of an area of the Nazca Desert in Peru with the condor geoglyph in the middle. Radiating outward from the central rectangle are seven sections, each featuring a graphical representation of one of the Nazca Lines geoglyphs and phrases from Alan Davie's texts and/or a tone row. The geoglyphs included are the hands, pelican, spider, monkey, condor, and two unidentified glyphs. Item also includes a copy of the five tone rows used in this part of the composition, extracted from the full score.
Item contains a colour copy of the score used by the wind quintet for part 3 of Nasca Lines in graphic notation. The graphic notation is taken from an aerial representation of an area of the Nazca Desert in Peru, featuring the condor geoglyph in the centre and coloured yellow for the wind quintet.
Item is a black and white copy of the full score for Nasca Lines in graphic notation. The score includes representations of flashcards used by the conductor in this part, including VETO A, B, and C and flashcards indicating different improvisational styles.
Item contains a copy of the performance notes for Nasca Lines, including an inserted page of additional notes. The performance notes include instructions for each of the seven sections of the piece; a description of the composition; and diagrams of the orchestra and percussion performance layouts.
File contains the performance notes and trumpet parts for all sections of the composition except Part 2, where the trumpet is tacet. Because of the graphic notation in parts 1, 3, 3A, 5, and 7, there are no individual instrumental scores for these parts of the composition; instead, the musician was given a copy of the full score or score for a group of instruments (e.g. part 3). The musician then annotated their score appropriately. The trumpet part was likely played by Richard Simoneau, a trumpet player with the Upstream Orchestra, as there are references to a trumpeter named Richard in annotations of other orchestral parts.
Item is a black and white copy of the full score for part 7 of Nasca Lines in mixed standard notation and graphic notation. This section of the composition revisits material from parts 2, 4, and 6, and includes representations of flashcards used by the conductor, including Veto A, B, and C and flashcards indicating various improvisational styles.
Item is a coloured copy of the full score for part 5 of Nasca Lines in graphic notation. The score includes representations of the flashcards used by the conductor for this part of the score, including colour flashcards that indicate instrument groups (yellow for the wind quintet) and flashcards that indicate improvisational styles via graphic representations of geoglyphs from the Nazca Desert, Peru. The score also features phrases from Alan Davies' texts.
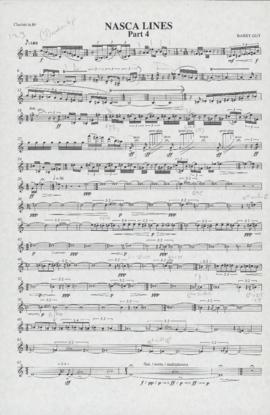
Item contains the clarinet part for part 4 of Nasca Lines in standard notation. The clarinet part features extended techniques, including quarter tones and multiphonics, and has frequent meter changes. Item also includes a copy of the last two pages of the full score for part 4, which have graphic notation.
Item is a black and white copy of the full score for part 3A of Nasca Lines in graphic notation. A rectangle in the centre of the score features the same image as part 3, an aerial representation of an area of the Nazca Desert in Peru with the condor geoglyph in the middle. Radiating outward from the central rectangle are seven sections, each featuring a graphical representation of one of the Nazca Lines geoglyphs and phrases from Alan Davie's texts and/or a tone row. The geoglyphs included are the hands, pelican, spider, monkey, condor, and two unidentified glyphs. Item also includes a copy of the five tone rows used in this part of the composition, extracted from the full score.
Item contains a colour copy of the score used by the wind quintet for part 3 of Nasca Lines in graphic notation. The graphic notation is taken from an aerial representation of an area of the Nazca Desert in Peru, featuring the condor geoglyph in the centre and coloured yellow for the wind quintet.
Item is a copy of the score used by the accompanying instruments (clarinet, bassoon, tenor sax, baritone sax, bass clarinet, electric bass, electric guitar, double bass, and synthesizer ) for part 2 of Nasca Lines, in graphic notation.
Item is a black and white copy of the full score for Nasca Lines in graphic notation. The score includes representations of flashcards used by the conductor in this part, including VETO A, B, and C and flashcards indicating different improvisational styles.
Item contains a copy of the performance notes for Nasca Lines. The performance notes include instructions for each of the seven sections of the piece; a description of the composition; and diagrams of the orchestra and percussion performance layouts.
File contains the performance notes and clarinet parts. Because of the graphic notation in parts 1, 2, 3, 3A, 5, and 7, there are no individual instrumental scores for these parts of the composition; instead, the musician was given a copy of the full score or score for a group of instruments (e.g. parts 2 and 3). The musician then annotated their score appropriately.
Item contains a copy of the performance notes for Nasca Lines, including an inserted page of additional notes. The performance notes include instructions for each of the seven sections of the piece; a description of the composition; and diagrams of the orchestra and percussion performance layouts.
File contains the performance notes and oboe parts for all but part 2 of the composition, as the oboe is tacet during this section. Because of the graphic notation in parts 1, 3, 3A, 5, and 7, there are no individual instrumental scores for these parts of the composition; instead, the musician was given a copy of the full score or, in the case of part 3, a copy of the score for the wind quintet. The musician then annotated their score appropriately. The oboe part was likely played by Suzanne Lemieux, an oboist with Symphony Nova Scotia.
Item is a black and white copy of the full score for part 7 of Nasca Lines in mixed standard notation and graphic notation. This section of the composition revisits material from parts 2, 4, and 6, and includes representations of flashcards used by the conductor, including Veto A, B, and C and flashcards indicating various improvisational styles.
Item is a coloured copy of the full score for part 5 of Nasca Lines in graphic notation. The score includes representations of the flashcards used by the conductor for this part of the score, including colour flashcards that indicate instrument groups (yellow for the wind quintet) and flashcards that indicate improvisational styles via graphic representations of geoglyphs from the Nazca Desert, Peru. The score also features phrases from Alan Davies' texts.
![Nasca lines : part 7 : [full score]](/uploads/r/dalhousie-university-archives/f/7/8/f7831741e61a3925098d3178c8f323d5ee7ede7aa146d5d7be15cb2eeb1160a7/MS-5-16_OS9_6_access_142.jpg)
![Nasca lines : part 7 : [full score]](/uploads/r/dalhousie-university-archives/a/6/9/a69f93070ac3118a38661f6c366aa2ace6070201e87577dc03add5ae406edcf3/MS-5-16_OS8_9_access_142.jpg)
![Nasca lines : part 5 : [full score]](/uploads/r/dalhousie-university-archives/8/9/1/89108535f36db6fa8aec15eca84d665284c1f46a64e07737086f7a1b76d3ba6a/MS-5-16_OS8_7_access_142.jpg)
![Nasca lines : part 2 : [accompanying instruments]](/uploads/r/dalhousie-university-archives/9/9/6/99664ce13b87cb2a42b77616b54ba17ba32fc2556c9d6b1a5d524acab29e0b85/MS-5-16_OS8_3_access_142.jpg)
![Nasca lines : part 1 : [full score]](/uploads/r/dalhousie-university-archives/1/f/b/1fb016d5098a640b48f12a68cd1d44514561fbe0dd992569a9d29539fb3e8ad5/MS-5-16_OS8_2_access_142.jpg)

![Nasca lines : part 7 : [full score]](/uploads/r/dalhousie-university-archives/4/f/3/4f3213498992702b3b0aacaf6e60816ff9f19399f584989f0e18977b1a4efbac/MS-5-16_OS7_9_access_142.jpg)
![Nasca lines : part 5 : [full score]](/uploads/r/dalhousie-university-archives/b/d/3/bd3048621a58740a8b45a6c1ace968b4c0aa760df661b1188a5487c66d90c459/MS-5-16_OS7_7_access_142.jpg)

![Nasca lines : part 3A : [full score]](/uploads/r/dalhousie-university-archives/4/7/3/4736d8fe2cd6c6579e19af4c2f05a8d08f10e7cceec011950c7894dc697a68da/MS-5-16_OS7_5_access_142.jpg)
![Nasca lines : part 1 : [full score]](/uploads/r/dalhousie-university-archives/f/2/3/f231976b3fb8c813a3ecdaf4bee583f17aceced871a472ed6fe5f9c64060fac4/MS-5-16_OS7_2_access_142.jpg)
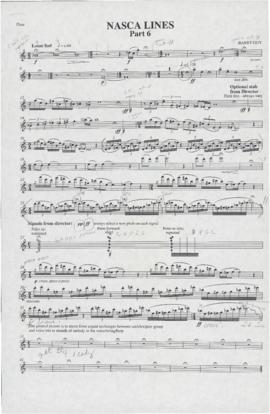
![Nasca lines : part 7 : [full score]](/uploads/r/dalhousie-university-archives/5/f/0/5f049d18eacba1e7dfce5360002a86986f7a562ac9fd6d6c2a8238db32c85bc5/MS-5-16_OS6_9_access_142.jpg)
![Nasca lines : part 5 : [full score]](/uploads/r/dalhousie-university-archives/5/1/e/51e9fcb19bdffda8c27f077f3f5663a2aa78cfe4674a92b83f99c3ab77d9416e/MS-5-16_OS6_7_access_142.jpg)
![Nasca lines : part 3A : [full score]](/uploads/r/dalhousie-university-archives/3/2/e/32e7595a9fd51148a602a6db79a30020c272b9cbdfa41502db2a78ce1d313f58/MS-5-16_OS6_5_access_142.jpg)
![Nasca lines : part 2 : [accompanying instruments]](/uploads/r/dalhousie-university-archives/a/1/2/a12b836e6d74258d9a47d51a9d292c5649dc74da6da5bd9a73a1a65d230cad7c/MS-5-16_OS6_3_access_142.jpg)
![Nasca lines : part 1: [full score]](/uploads/r/dalhousie-university-archives/c/7/6/c76c9234783869473f415a0f0c9f9a5cc93e186873cf33e548aab02097c6ebc3/MS-5-16_OS6_2_access_142.jpg)

![Nasca lines : part 7 : [full score]](/uploads/r/dalhousie-university-archives/5/5/d/55dd51c292e63cf1013cb36a7492a069d05de2fffef9ee99401d0793846000c0/MS-5-16_OS4_8_access_142.jpg)
![Nasca lines : part 5 : [full score]](/uploads/r/dalhousie-university-archives/4/3/3/43326735eb4bcfc1062e7be485a0ccdc3d0488584c4e98a904a411f6c8ab98ac/MS-5-16_OS4_6_access_142.jpg)